You have probably now read Part 1, The Dark Arts of Dust Collection. And should be relatively familiar with some of the key concepts and equipment behind building an effective dust collection system. You would also have met Alex, a typical enthusiast woodworker who needs a decent dust collection system as well. Now for the fun part - building your dust collection system.
Here are Timbecon’s six simple steps to designing an effective and efficient dust collection system.
Step 1 – Draw a Floor Plan of your workshop
Step 2 – Sketch out where the Ducting will go
Step 3 – Calculate the CFM Required
Step 4 – Calculating the diameter of the main duct
Step 5 – Choose your dust collector
Step 6 – Let’s build this thing
Step 1 – Draw a Floor Plan of your workshop
The best place to start is the beginning.
Draw a plan of your workshop
Design is the first step in any successful project. To start this project, we first need to measure and create a drawing of your workshop. This need not be complicated, just measure the length of the walls and create a clear drawing on a piece of A4 paper. Use a ruler to make your drawing, that way you can keep it to scale or thereabouts. On this drawing mark where the door is, where the roller door is, any windows or obstacles such as the hot water system.
Determine the preferred location of your dust collector
With drawing in hand, walk around your workshop and assess where your equipment will be placed including your bench and storage units. When it comes to machinery, work out where you want your dust collector first. A place where it is easily accessed for cleaning and where exhaust air has the best chance of getting away. I suggest right by the roller door if you have one. Mark the location of the dust collector on your workshop floor plan.
Determine the location of dust producing machines
Next, determine where your machines will go. It’s a good idea to place machines that create the most dust or require the highest CFM nearest to the Dust Collector. Machines that produce a lot of dust such as a thicknesser usually require clear working space around them. If your dust collector is near the roller door, that’s also a good place for a thicknesser. Mark the location of your machines on the workshop plan.
Group machines together
Try to group your dust producing machines together as much as possible. This will help reduce the amount of ducting required and reduce the level of static pressure created. Make sure the machine dust ports are positioned so they point towards where the ducting will be potentially located.
What does Alex do?
Alex chooses to place the dust collector to one side at the main entrance of the garage, far away as possible from the internal door. When operating Alex can open the roller door and let any residual unfiltered dust blow away outside. And when emptying the hopper, Alex can roll the wheelie bin right up to the machine. Alex knows the combination machine produces the most dust, so it is placed close to the collector in the doorway. This also means long pieces of wood can be fed into the machine when the garage door is open. After all, Alex’s workshop is quite small.
Step 2 – Sketch out where the Ducting will go
Once you have your machines drawn roughly in place, you can think about how the ducting will link them all to the duct collector.
Include a central line of ducting
On your floor plan, sketch out where your ducting will potentially go. The best approach is to have a central ducting line. One line of ducting that runs through the workshop from the farthest machine to the dust collector in a straight line. All the other machines in the workshop then link to this central line. This approach helps to minimise the amount of ducting required, thereby reducing static pressure.
Remember – ducting lives mostly on the ceiling
Using a central line of ducting also helps to reduce the potential for clutter. Ducting usually lives overhead and the last thing you want is pipes running everywhere across the ceiling. Otherwise, your workshop will end up feeling like the Alien’s nursery. The beautiful thing about sketching your ducting system out before building is that you can spend time experimenting, finding the simplest layout before you spend a cent.
Draw in the branches
The individual sections of ducting that link the various machines to your central line are called branches. Include all the branches required on your drawing. You can now start assessing what types of fitting you will need in particular Y pieces and possibly any bends or reducers.
Note down the dust port sizes
This is a good time to measure the size of each machines dust port and note it on the drawing. Generally, the dust port diameter and the corresponding branch diameter are the same. If the branch diameter needs to be different in some way to the dust port, note that on your drawing.
Where is Alex up to?
Alex has placed the bandsaw and router table along one side of the workshop, the same side as the dust collector. Alex will run a central ducting line along that wall above the two machines and create two individual branches. Because the combination machine lives in the centre of the main garage entrance, Alex decides to link that machine to the collector via a separate branch made from flexible PVC that runs across the floor. Why? Because this machine in the doorway it creates an obstruction. To counter this, Alex will place the combination on a mobile base so it can be wheeled out of the way when not in use. The flexible PVC may be simply rolled up and stored away until required. See drawing 1 below, Alex's Workshop Floor Plan.
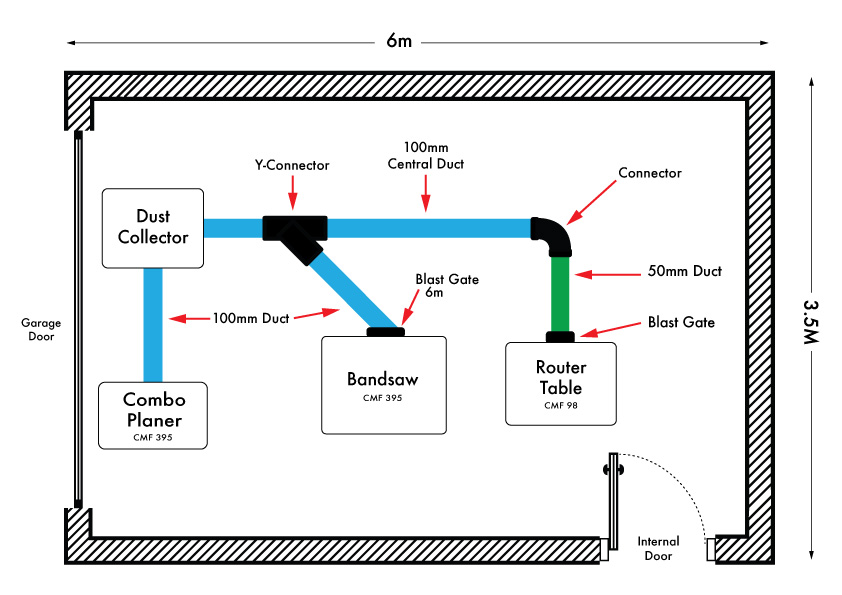
Drawing 1. Alex's Workshop Floor Plan
Step 3 – Calculate the CFM Required
We can now calculate the CFM required by your dust collection system. Use the Dust Collection Parts List template below to calculate the CFM – see Table 3 below. If you have followed steps 1 and 2 above, you will already have all the information required written on your floorplan drawing. If you are unsure on how to calculate the CFM for each machine, go back and read Part 1 of this guideline - it’s all there.
What is the CFM Alex’s system?
Alex has used this simple template illustrated below to calculate the total CFM required.
| Machine |
Dust Port Dimension |
CFM Required |
| Combination Thicknesser Planer |
100mm |
395 |
| Bandsaw |
100mm |
395 |
| Router Table |
55mm |
90 |
| |
Total CFM Required |
888 |
Table 3. Dust Collection Parts List
Let’s take a breather
Before we go any further, let’s review your drawing and where you are at.
- You should have a drawing, roughly to scale and indicate where all the features are including doors, power points and any obstacles. Each machine should be drawn in place, hopefully grouped together as tightly as possible.
- The ducting should be sketched out, the main line and any branches. On the branches you should have noted the diameter of the machine dust port and notes on whether the branch ducting diameter is different to the dust port.
- You may have also estimated the total length of ducting and the types of fitting required.
You now have a mud map for your ducting system. And using the parts template, you can calculate the CFM required to run your dust extraction system.
The Next Step
The next step is to determine the diameter of the central duct. You may have guessed already that Alex may not require a central duct of more than 100mm. Yet for those of you who have larger systems, calculating the diameter of the central duct is a critical step. Also, we have not made any real attempt to list in detail what fittings are required, in particular blast gates. This step is best completed after the central line is determined.
Step 4 – Calculating the diameter of the main duct
An important part of determining the diameter of the main duct is to understand what machines your primary machines are.
Primary Machines
Primary machines are those you use the most, and the machines that have a permanent open path to the dust collector. They are also the machines that you may operate simultaneously at times. Most enthusiasts may never run more than one machine at a time. Yet some may run two machines simultaneously to save having to turn machines on and off as they run through a process.
Alex has two primary machines, the bandsaw and the router table. These machines are both serviced by the central line running along the wall to the dust collector. Alex’s combination machine is not connected to the central line and so plays no part in the central line CFM calculation.
Calculating the diameter of the central line
Start with the primary machine branch that is the furthest from the dust collector. Run that size duct until the next primary machine branch enters the main duct. The ducting must be large enough to accommodate both the machines CFM’s. In Alex’ case the calculation is 98 (router) + 395 (bandsaw) = 493 CFM. See updated Duct Collection Parts List Table 4 below.
| Machine |
Dust Port Dimension |
CFM Required |
Primary Machine |
Total Branch CFM |
| Combination Thicknesser Planer |
100mm |
395 |
No |
0 |
| Bandsaw |
100mm |
395 |
Yes |
395 |
| Router Table |
55mm |
98 |
|
98 |
| |
|
|
|
493 |
| Table Saw |
100mm |
395 |
|
395 |
| |
|
|
|
888 |
Table 4. Updated Dust Collection Parts List
A CFM of 493 is too large for a 100mm central line of ducting, refer to Table 1 in Part 1 of this article for details. A CFM of 493 would be better served by a central line diameter of 125mm. If both the bandsaw and router table are to remain primary machines, that is, they both have an open line to the dust collector, Alex should use a central line duct of 125mm with branch line ducts of 100mm.
Keep in mind also, Alex is saving to buy a table saw that would require a further 395 CFM if connected to the central line. Alex would therefore need to accommodate 888 CFM see Table 4. A CFM of 888 requires a central line diameter of 150mm! Alex does not want to install a 150mm central line in the workshop, what can be done?
Blast Gates
Enter stage left blast gates. You do not necessarily need to increase the central duct size if you use blast gates. If you do not intend to use machines simultaneously as primary machines, install a blast gate on each machines branch. When not in use simply close the blast gate to minimise the CFM required to service your machinery.
Ignoring static pressure, Alex only needs to allow for enough CFM to draw on the largest machine along the central line – the bandsaw. Alex can add blast gates to both machine branches and open and close as required. This reduces the maximum required CFM from 493 back to 395 that may be managed by a 100mm central line.
If Alex does add a table saw to the central line, a blast gate added to the table saw branch will allow it to be serviced adequately as well. The extra ducting required to accommodate the table saw will increase static pressure. Alex should be mindful to use a low friction ducting to build the central line and keep the system as compact as possible.
If your dust extraction system is likely to grow by adding additional machines, or it is difficult to keep the machine shop compact - both these situations will result in increased static pressure. Deal with this by making the central line a larger diameter right from the start. The rule of thumb is to allow for a bigger system than you require, a small increase in cost at the start saves major headaches later.
Decision Made
Alex decides to use blast gates and stick with a 100mm central duct line built from PVC spiral ducting . For the branches Alex will use 100mm PVC spiral ducting for the combination machine and bandsaw, the router requires a length of 55mm spiral. If Alex does purchase the table saw in the future, the spiral ducting central line will be replaced by Plumbing PVC and the existing spiral used to make the additional branch. But that’s a tomorrow job. With this information, Alex can now complete the Dust Collection Parts List Table 5. Alex also estimates the length of ducting required for each branch and includes in the Parts List.
| Machine |
Dust Port Dimension |
CFM Required |
Primary Machine |
Total Branch CFM |
Branch Ducting |
Fittings |
| Combination Thicknesser Planer |
100mm dust port |
395 |
No |
0 |
1.5 metres 100mm spiral PVC |
2x hose clamps
1x cover cap |
| Bandsaw |
100mm dust port |
395 |
Yes |
395 |
1.5 metres 100mm spiral PVC |
1x Y connector
4x hose clamps
1x 100mm blast gate
1x cover cap |
| Router Table |
55mm dust port |
98 |
|
98 |
1.5 meters 55mm spiral PVC |
1x Y connector 100mm/50mm
1x 55mm blast gate
4x hose clamps |
Table 5. Completed Dust Collection Parts List
Alex will also require a three-metre piece of 100mm spiral to build the central line. Hooks to hold the central line to the ceiling. And four additional hose clamps to fit the Y connectors and to fix the central line to the dust collector. All 4 steps and gathered pieces of information are brought together in Alex’s final floor plan drawing, see Drawing 1.
Step 5 - Choose Your Dust Collector
The CFM required by the central line some what determines what dust collector you need. Alex’s central line requires 395 CFM, so a dust collector that generates at least this amount is ok. Again, the rule of thumb is to go bigger than required so a collector with a CFM of 395 should be considered the absolute minimum.
Choosing the type of dust collector, you need is a personal decision based on several factors besides the CFM required. Budget, quality of filtration and the size of the machine will all impact the decision-making process. A standard two horsepower dust collector such as the Sherwood FM-300 is a good place to start. This machine offers 1200CFM which is adequate for most enthusiast’s workshops such as Alex’s. The additional benefit of a machine such as this is that it is compact and accepts upgrades such as a pleated filter. Machines with less horsepower often have limited accessories available. The FM-300 dust collector will also plug directly into a standard residential GPO making it the perfect dusty for most home workshops.
The best advice is when you are ready to buy your dust collector, consult with one of our customer service professionals at Timbecon. They can help you through the decision-making process, so you get the extractor right for you.
A note on power points
A standard household GPO has a 10amp plug. This is an adequate power point for lots of woodworking machinery. Note however, many machines with larger motors up to three horsepower require a 15amp power point to operate. There has been more than one disgruntled woodworker screaming down the phone because they can’t plug in their new machine when they get it home. When purchasing your dust collector, be sure you have the right power available in your workshop.
Step 6 - Let’s Build this Thing
You would have noted that right up to this point the process of building a dust collection system is a process of design. It is not until step 6 that you actually build anything.
Assuming you have gathered all the required parts, it’s time to assemble your collector system. Our suggestion is that you unpackage everything and lay it out on the floor so you can lay the parts out in their respective locations. Once you have the central line laid out with fittings in place, install it first into position. Then you can work on the branches down to your machines. One can only assume however that you will tackle this part of the process the way you normally like to.
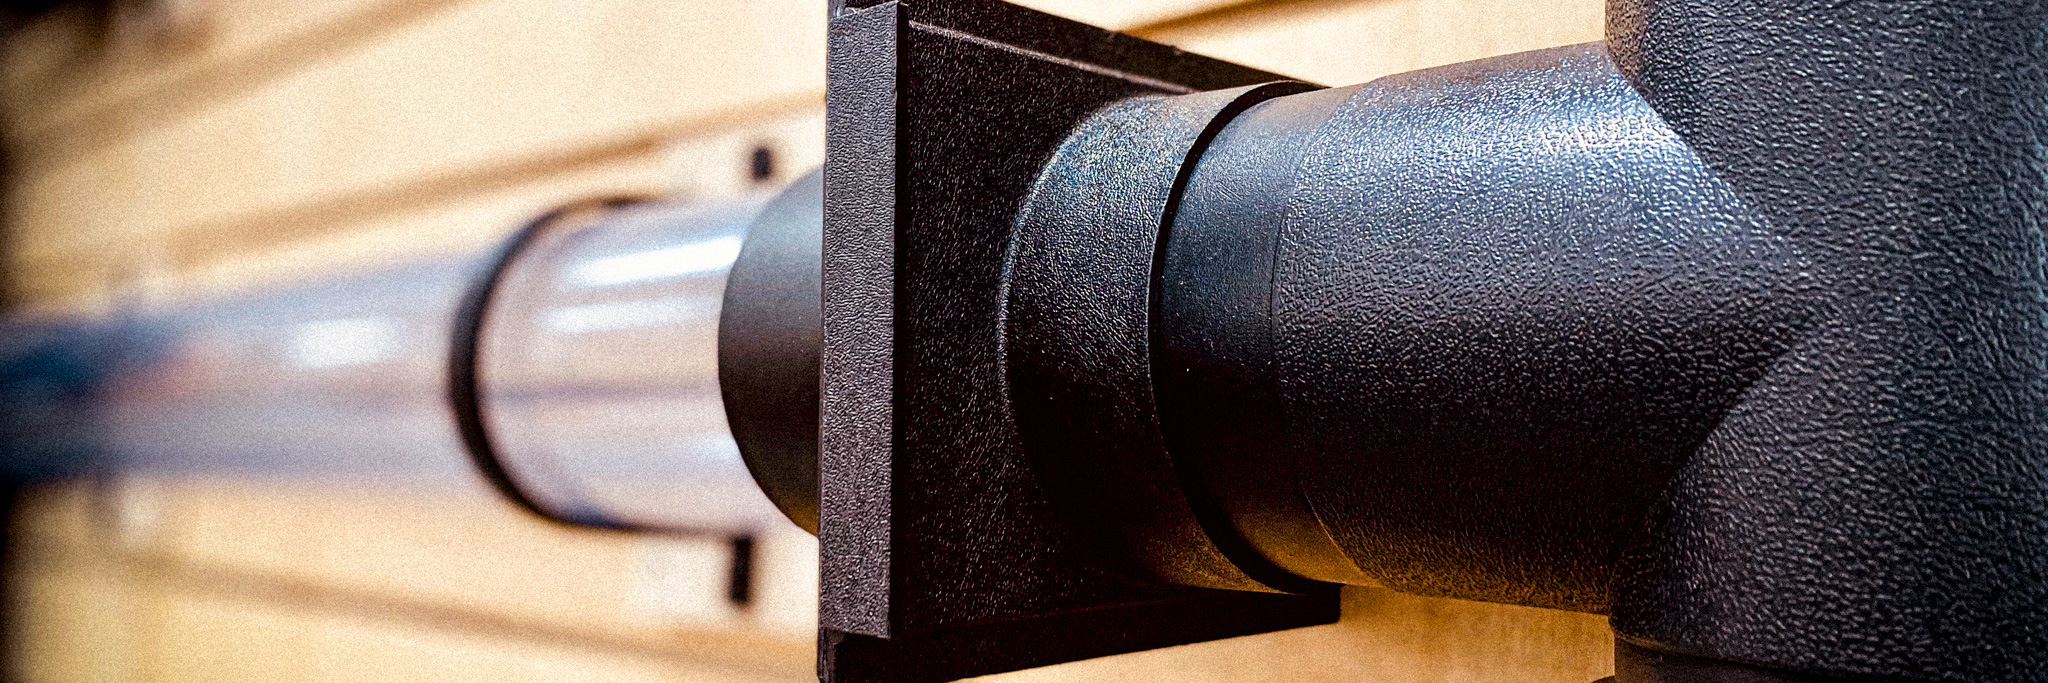
There is no especially fancy equipment required. All you really need is a box knife and screwdriver. To hang the ducting on the ceiling you will probably need a step ladder, cordless drill, bits and pieces. I suggest you invite a mate over to help. Some good quality duct tape will be very useful to seal up your system particularity where you have located plastic fittings such as the Y pieces. Duct tape is a dust collection systems best friend.
And don’t stress about putting the system together. Like Lego, these items come apart as easily as they go together. If it doesn’t quite work, pull it apart and do it again.
The Wrap
So, we are at the end of this conversational guideline on how to build your own dust collection system. And we hope that this document is useful when you decide a dust collection system for yourself. On the surface dust collection would appear a relatively straight forward topic. However, the process of building a dust collection system that actually works and protects your health is a little more complex. Do not let this complexity put you off, get on and build one, once done, your lungs will thank you. If you get really stuck, contact Timbecon, and we will do the best we can to assist.
Shop Dust Extraction Now!